Germinating the seeds
Plant your seeds immediately for the best germination rate » Your seeds might arrive with some mold on them, since they are sent moist. If they have mold, simply rub it off on a wet towel. A little mold on them will not affect germination. Getting started -- These seeds sprout best after a refrigeration process, which is explained below. First, soak the seeds in a cup of water for 12-24 hours (not more than 36 hours). Use small containers that have drainage
holes, such as seedling starter trays Place a seed in each container and cover
with 1/4 inch (1 cm) of soil. Add water until even moist. For the next 6 weeks, keep them in an area that will stay about 65-79 degrees (17-26ºC). Cooler conditions at night are
okay; avoid temperatures above 80ºF (27ºC) for prolonged periods. I
recommend placing a
minimum/maximum thermometer After 6 weeks, seal them in a plastic container or strong bag, and place them into a refrigerator that stays above 37º F (2ºC). Keep them there for 8 weeks. There is a small chance they will sprout in the refrigerator, so mark your calendar to check on them after the second and fourth week, and remove any that have sprouted. Remove them after 8 weeks in the refrigerator, and keep them at the same temperature range stated earlier. If you enclose the pots in a plastic container to maintain moisture, leave it open slightly to allow some fresh air to enter, to prevent stem rot later. They should begin sprouting around 6 to 8 weeks after removing them from the refrigerator, but allow up to 20 weeks for any slow ones. Once they sprout give them bright light, but shade them from strong afternoon sun. A bright LED light kept 3-4 inches (8-10 cm) away provides the right amount of light (See: "Growing indoors with LED lights"). Transplanting -- Wait until the 2nd or 3rd shoot has grown in before repotting. Gently move it to a pot about 4-5 inch (10-12 cm) wide , which will hold it for a few months. Then move it to 1 gallon (4 liter) pot for 9-12 months. It can then go into its permanent home - about 5-10 gallons (20-40 liters), or into the ground in suitable areas. Repot gently to avoid breaking apart the soil ball, which can damage the roots. Water the soil before transplanting, to keep it from breaking apart. Fertilizing -- The
first 3 months, feed ever 2 weeks with a small amount of dilute (1/8 strength) liquid fertilizer.
Hydroponic fertilizer
is ideal for this, because it is easily absorbed and contains all essential
nutrients. After 3 months, you may switch to a granular fertilizer Growing onward.. Watering -- Bomarea likes the soil kept evenly moist (but not soggy).
Don't let it dry out. If you're unsure if the root zone is moist enough,
use a
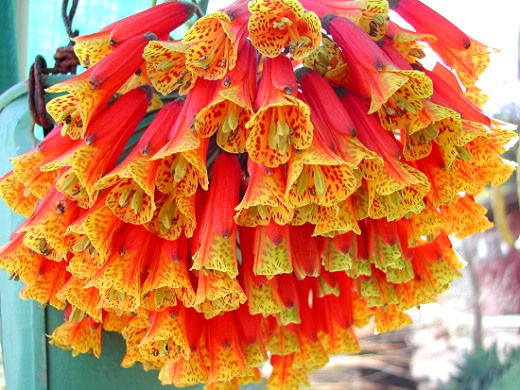
moisture meter Light -- Bomarea likes about a half a day of sun. It can take more sun in cool, coastal areas. It should be given some protection from strong afternoon sun, especially in warmer areas. Climate -- Most Bomareas come from cloud forests of the Andes mountains, where temperatures are mild all year and nights are cool. Most Bomareas don't thrive in hot climates, especially if nights are warm. It's possible that this plant will not perform well if temperatures consistently get above 85° F (30°C) and nights are above 65° F (18°C). The foliage may be killed by frost, but the tubers of mature plants should be hardy to at least 25°F (-4°C). I recommend keeping them above 40°F (4°C) the first 2 years. Indoors, over about 40% humidity is best. Up and away -- Bomarea likes to climb, so eventually it will need something to twine itself around, like a trellis, fence, or another plant. It should ideally be under 1 inch thick (3 cm), so the shoots can wrap around it. A 6 foot (2 meter) trellis should work, although larger is better if possible. If the shoots grow too long, wrap them down and around your trellis. Don't prune the shoots, since the flowers appear from the growing tips. By the way, the tubers should not be dug up. They are food storage organs, and separating them can damage the plant. Pests to watch for -- Snails and slugs can be a problem in prone areas. Watch for other pests that are common in your area. Feel free to contact me if you have questions. Have fun growing them! - Jeff Strange Wonderful Things
|
|||||||||